|
Blueprints
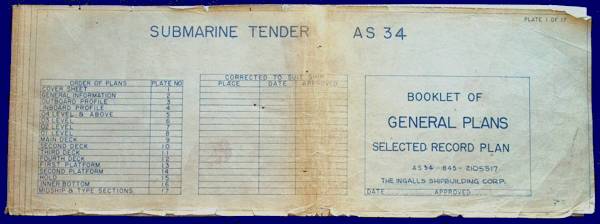
General Plans Booklet
Thanks to shipmate Robert Mutnansky (DP3 - 1966-1967 - XD Division) the Association now has full set of ship blueprints. You will be able to re-visit all your working and berthing compartments. Enjoy your virtual tour of our ship!

Contract Plan Booklet
Super Canopus supporter, Tom Denton (ETC SS/SW - 1987-1991 - W-6 Weapons), has previously allowed free use of his Canopus watercolor print and provided a copy of his photo album to our Photos page.
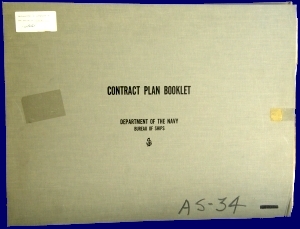
Now he has donated an amazing 72 sheet Contract Plan Booklet to the Association. Besides being able to see your working compartment layout, enter the Security Locker and walk past the Marine guard to see all those secret places in RC and Weapons without causing a security violation!
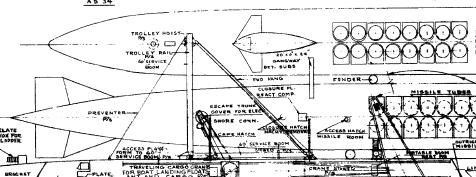
|

| Plan No. |
Hull |
|
Inboard & Outboard Profile General Arrangement |
|
02 Level & Above General Arrangement |
|
01 Level, Main & 2nd Decks General Arrangement |
|
Third Deck, Fourth Deck & First Platform General Arrgt. |
|
Second Platform & Below General Arrangement |
|
Lines and Molded Offsets |
|
Midship Section |
|
Arrangement of Hospital, Commissary, Messing, Recreation, Conference Room, Service Spaces & Senior Officers Quarters |
|
Missile Stowage Servicing & Handling Systems |
|
Missile Transfer & Cargo Handling Arrangement |
|
Ammunition Stowage & Handling |
|
Anchor Stowage & Handling |
|
Rudder, Steering Gear & Shaft Struts |
|
Shell Plating & Sections |
|
4th Deck & Below Scantlings |
|
Main, 2nd & 3rd Deck Scantlings |
|
Superstructure |
|
Cargo Flow Plan & Handling Equipment |
| |
|
| |
|
|
Power Distribution System, Schematic Wire Diag. Sheet 1 |
|
Power Distribution System, Schematic Wire Diag. Sheet 2 |
|
Power Distribution System, Schematic Wire Diag. Sheet 3 |
|
Power Distribution System, Schematic Wire Diag. Sheet 4 |
|
Switchboards |
|
Lighting Distribution System, Schematic Wire Diagram |
|
List of Motors and Controllers, Sheet 1 |
|
List of Motors and Controllers, Sheet 2 |
|
List of Motors and Controllers, Sheet 3 |
|
List of Motors and Controllers, Sheet 4 |
|
List of Motors and Controllers, Sheet 5 |
|
FBM & Weapons System Block Diagram, Sheet 1 |
|
FBM & Weapons System Block Diagram, Sheet 2 |
|
FBM & Weapons System Block Diagram, Sheet 3 |
|
FBM & Weapons System Power Distribution Diag. Sheet 1 |
|
FBM & Weapons System Power Distribution Diag. Sheet 2 |
|
FBM & Weapons System Power Distribution Diag. Sheet 3 |
| |
|
| |
Machinery |
|
Firemain System 2nd Deck & Below |
|
Firemain, Washdown & Foam System, Main Deck & Above |
|
Firemain & Foam Systems Elevation & Foam Details |
|
Main & Secondary Drainage & Ballasting Systems |
|
Compressed Air & Oxygen-Nitrogen Systems |
|
Diagram of Pure Water System |
|
Radioactive Waste System |
|
Arrangement of Machinery Plan Views |
|
Arrangement of Machinery Sections |
|
Arrangement of Machinery Elevations & Shafting |
|
Arrangement of Uptakes & Smokepipe |
|
Arrangement of Machinery Emergency Generator
& Pump Rooms |
|
Arrangement of Shops Main Deck & Above |
|
Arrangement of Shops 2nd Deck & Below |
|
Arrangement of Torpedo, ASTOR & Subroc Workshops,
4th Deck & Below |
|
Diagrammatic Arrangement of Feed & Condensate System |
|
Diagrammatic Arrangement of Steam & Exhaust Systems |
|
Diagrammatic Arrangement of Fuel Oil Transfer & Service System, Diesel Oil Cargo & Transfer System, & Tank Stripping System |
|
Diagrammatic Arrangement of Lubricating Oil Systems |
|
Heat Balance & Flow Diagram, 80% Full Power (2 Boilers) |
|
Heat Balance & Flow Diagram, 12 Knots Endurance
(1 Boiler) |
|
Heat Balance & Flow Diagram, Full Power (2 Boilers)
|
|
Heat Balance & Flow Diagram, Tending (1 Boiler) |
| |
|
| |
Electronic |
|
Radio Communication System, Sheet 1 |
|
Radio Communication System, Sheet 2 |
|
Radio Communication System, Sheet 3 |
|
Radar, IFF & Sonar Systems |
|
ECM, Infrared & Navigational Systems |
|
Squadron Flag Operations Plot, General Arrangement |
|
Radio Central & Secure Teletype Rooms, Arrangement of Equipment Plan View, Sheet 1 |
|
Radio Central & Secure Teletype Rooms, Arrangement of Equipment Plan View, Sheet 2 |
|
Crypto Room & Secure Communication Annex, Arrangement of Equipment |
|
CIC, Chart Room, Pilot House, & Bridge Wings, Arrangement of Equipment, Sheet 1 |
|
CIC, Chart Room, Pilot House, & Bridge Wings, Arrangement of Equipment, Sheet 2 |
|
Antenna Arrangement |
|
Required Electronic Test Equipment Association & Stowage Chart, Sheet 1 |
|
Required Electronic Test Equipment Association & Stowage Chart, Sheet 2 |
Tom has done a complete series of watercolor prints
of the Sub Force. Click the Canopus print to go directly
to his website to order: |

|
Did you live in base housing in Rota? If so, check out the blueprint:
Take a tour of the Photo Lab as of Dec. 1967: 
|